
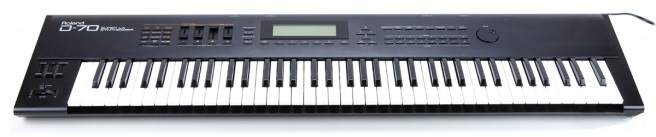
A few years ago I bought a broken Roland D-70. I recently came across the pictures of the repair so I’m sharing this just in case anyone needs help fixing their D-70 🙂
Technical specifications:
- Polyphony – 30 voices
- Oscillators – Digital ROM samples and DLM (“Differential Loop Modulation”)
- LFO – YES
- Filter – TVF FILTER: low-pass-resonant (like D50).
- VCA – TVA (like D50).
- Effects – Reverb, Chorus, Flanger (like D50)
- #Instruments – 5-parts + 1-percussion
- Keyboard – 76 note keyboard with velocity and aftertouch
- Arpeg/Seq – None
- Memory – 10 user sets, 64 performances, 128 patches, 128 tones.
- Control – MIDI
- Date Produced – 1990-91
The D-70 I bought had problems with the keybed. Apart from the Red Glue issue a lot of keys on the left hand side of the keyboard didn’t work. At home I took it apart to find out that the construction of the keybed is identical to the U-20, D-5 and JD-800 (and probably some others including the KR-series I think)
These are very nice keybeds to play but they used a very flimsy pcb (circuitboard) made of a thin plastic film which is extremely fragile.
The D-5, U-20 and JD-800 have a single pcb running underneath the keys but the D-70 has 2. I’m borrowing this picture from a D-5 I repaired but this is how the connector should look:

A D-70 has a connector just like this one the left and right hand side of the keybed. It’s 2 plastic parts glued together and then held together by a transparant plastic strip. Very fragile. If you disconnect this you most likely destroy the 16 traces that are in the flexible ribbon cable and it will never work again.
If you ever buy a D-5, U-20, D-70 or JD-800 and only a few keys don’t work it’s probably a matter of cleaning the key contacts but it a lot of keys don’t work anymore it could be this connection that has come loose.
Some repair this by replacing the plastic strip by a metal one to apply pressure to the connection. Sometimes this works.. I tried it on my D-70 but pretty much all the keys on the left hand side stayed dead.
Roland sells a replacement part for this. The white ribbon cable and the green flexible pcb are now one part instead of two. So no more fragile connection. You will also need a new little pcb that’s on the back of the keybed (where the white ribbon cable goes to). I’ve asked for a quote and it costs around a 150 euro’s.. Since a mint D-70 is worth about a 100 euro’s I didn’t buy the part.
Here is how I fixed it. Hackish? Hell yes, but it works like a charm 🙂


I used 16 wires from a standard network cable. I glued them to the green pcb with a strong glue (the yellow / brown stuff). This is just to keep them in place. Then I used ‘Wire Glue’ which is an conductive glue to glue the 16 wires onto the traces of the green pcb.
After I tested for continuity I soldered all 16 wires to the small pcb where you would normally attach the white ribbon cable. This was not a very easy job and I don’t know if I ever want to do it again 🙂
Well, at least I saved one D-70 from the scrap heap 😀

What type of wire glue do you use? I bought some graphite based wire glue and it did not close the circuit when tested with a multimeter.
LikeLike
Just type ‘Wire glue’ in google. The first 100 images display exactly what I bought 🙂
For instance:
LikeLike
great Solution. Thanks.
Is it possible to use Carikoke 44 conductive paint and redraw the traces ?
Thank You. So Frustrated.
LikeLike
Hi Ken,
I’m not sure but by the looks of it it might work.. Caikote 44’s main use is to fix the conductivity of rubber contacts but it’s glue and it conducts electricity so it might be worth a try.. on the other hand: wire glue isn’t really expensive..
grtz, Jorick
LikeLike
Hi ! Great post but scary ! I am experiencing that.. ..could you tell me if I have to scratch a little the green pcb before to apply wire glue ? …also.. what make the small white strip to die ??? When It doesn’t seem folded nor broken… :s
LikeLike
Hi Ed,
If you separate the connector you should see black exposed contacts coming from the green pcb. These black tracer are usually damaged. You can repaint them with wireglue. Just be carefull not to connect the 16 individual traces. If the black contact trace is completely gone you can also scrape some plastic off the green pcb exposing the trace within it so you can glue a wire (with wireglue) to that trace. I’ve done so on my JD-800 (look for pictures in that post).
Before I had wireglue I only had silver paint. This is very thin so this made repainting the traces almost impossible. Now that I know how wireglue works I would attempt to repaint the 16 traces on both ends of the connector and then putting the connector back together like it was.. might work. You can always resort to soldering 16 wires later..
Regards, Jorick
LikeLike
Waow ! What a cool advice… …I had already cut my Ethernet cables.. 🙂 tomorrow I’ll buy the wireglue somewhere and proceed to a test.. …just with the slips.. 😉 …another question, while playing with the strips, I have broken the two small hooks on a brown “locker” that secure the slip on the motherboard… I can still insert it, and I think it will do the job.. …did you experience this already ? Ps.. i’m Not an électronicien.. …just more or less handy man… :p Pps… your answers are very precious, thanks a lot… …if I bug you too much let me know… 😉
LikeLike
Waow, by having a closer look on the picture (wire links between between the green pcb and the connector, I couldnt imagine the 16 traces would go on each side (8/8) of the small back bridge pcb.. ..would you have a correspondance between both ? …it is very difficult to figure out on the picture… (lot of wires… :s ) ..thanks so much for your post… PS.. I was close to recover the contacts with this paint.. ..Thanks God I havent…
LikeLike
Hi Ed,
If you look at the first picture in this article you can see a perfect connector. This is what is should look like 🙂
The green pcb and the white flatcable both have 16 traces that are only exposed where they meet. If you already separated the connector see if you can repaint the traces with wireglue..
Regards, Jorick
LikeLike
Hi Jorick !! Ok, it is rewired.. 🙂 ..thanks for your precious help… …but unfortunately some keys are dead.. …it is not due to one of the traces.. .1 to 8 are well done.. …it is really the graphite which is dead I think… …I have read the pencil trick.. …but I don’t want it because for me it is a short term fix.. …I think the wire glue is not strong enough.. …so what would you do for that ? …regards, ed
LikeLike
Hi Ed,
Just clean the contacts with q-tips and alcohol. My ‘recent’ D-70 only had about 10 keys that worked. Cleaned everything and all keys work flawless again. Never used the pencil trick 🙂
Regards, Jorick
LikeLike
Hello Jorick.. …ok, i think I killed on d-70.. …but actually, you know, the one I killed was probably opened for dirty maintenance several times.. …so.. I have bought a second one.. …yes i’m a maniac !! :p …apparently the one I bought now has only several keys to clean, and not half the keyboard off.. :p (the first one, maybe i’ll try to fix it later or keep it for spare parts…) but I want a real and reliable one… …on the first one, one key was always sounding at 127 velocity, and I have killed the pcb contacts by excess of alcohol… …what do you think of the warm water + soap solution.. isn’t it less agressive ? Does it work ? …also, I have read your post on replacing the lcd screen light… ..you mention that once replaced, you have switched of the unneeded component which makes this annoying sound… …can you précise me which one is it ? Thanks.
LikeLike
Hi Ed,
My current D-70 is the first one where I put the rubber contactstrips in the kitchensink filled with soapy water 🙂 because the contacts where painted with silver paint I wanted to get all the residue off the contacts. Worked fine. After I dried them of I quickly cleaned the contacts with q-tips and alcohol, put the whole thing back together and all keys work fine first try.
I have yet to replace the display.. I saw photo’s of it somewhere else but as soon as I’ve replaced mine I’ll post pictures.
grtz, Jorick
LikeLike
Hi Jorick… …finally, I bought a second d70, 100€ flight case included.. 🙂 …I fixed it by just cleaning the rubber contact with isopropyl !!! It took just 3 hours, but the most time was spent taking the keyboard out… …this is really the most annoying point of the d70… …now i’ll see if I will fix the first one, or keep it as a spare parts stock.. ..probably I’ll fix it but later.. …actually I wanted a d70 because I had it 25 years ago.. I tried the JV90 but my heart goes to the d70… …although I will probably use it most of the time as a VST controller, ..mane I hate all these M-Audio keyboard-like.. :p …thanks again for your blog, and your advices…
…ps next thing I may try is to replace EPROM… later.. ..I may come to bug you again ! 😉
LikeLike
Hi Jorick,
I’m having the same issue with a busted flex-flex connection on the lower 32 keys, with 2 D70’s. I tried reapplying heat (as this connection was made in the first place), but no succes. I’m considering going down the wire-glue seperate wires road as you did.
However, I noticed you mentioned Roland is selling replacement parts, on which the flex-flex bond is no longer there. Altough EUR 150,- isnt cheap, I’m more then happy to spend this if my D70 will last another 10 years.
May I ask which Roland office you contacted to receive this information? Do you have a direct email adres of someone?
Many thanks!
Jeroen Oldenhof
The Netherlands
LikeLike
Hi Jeroen,
I contacted Dirk Witte muziek in Amsterdam. But any Roland dealer should be able to order the parts for you.
Greetz, Jorick
LikeLike
These are the partnumbers and prices I got:
1 x 03670156 CONTACT BOARD (NEW) SK-776 32P LOW 99,- EUR verkoop incl. btw 762162300A
1 x 03786934 CONNECTOR BOARD (NEW) LOW SK-776 41,- EUR verkoop incl. btw
LikeLike
Excellent, many thanks!
Groetjes, Jeroen
LikeLike
Hello… you mentioned that Roland still sells the flexible pcb and now this is just one part… Do you know if Roland is still selling it and how buy it? I am from Brazil, no worries to buy in the USA, but I am not sure how/where… thanks
LikeLike
Hi Alessandro,
I just contacted a local Roland dealer for the parts. There are 2 flex PCB’s in a D-70. Left and right. Here are the part numbers for the left side:
1 x 03670156 CONTACT BOARD (NEW) SK-776 32P LOW (I was quoted 99 euro’s including tax)
1 x 03786934 CONNECTOR BOARD (NEW) LOW SK-776 (I was quoted 41 euro’s including tax)
I have no idea if they still sell the parts but just ask a Roland certified dealer..
Regards, Jorick
LikeLike
Hello Jorick.
I’m looking for the high key contact board. What’s the part number of the right side board?
I’m finishing developing a mixed version of those boards and hope to put them on Ebay in a month or so. I’m just curious to know the part number to include it in the inscription on my new flex board.
LikeLike
Hi Remdale,
The original part numbers for the 2 connectorboards are:
22925866 CONNECTOR BOARD ASSY HI
22925867 CONNECTOR BOARD ASSY LOW
“HI” is de one on the right.
grtz, Jorick
LikeLike